Barista Resources
Barista Resources

In short:
• 1.75:1 or 2:1 Water :Coffee ratio
• For a double espresso, 18-21 grams coffee in, 36-42 ml water out
• 200-202 F water temperature
• 30-45 seconds extraction time
Pulling good shots of espresso is a serious craft executed with the help of science. There is a great amount of effort, thought, and artistry that goes into each shot. In this section we will be discussing the theory behind pulling shots, the process of extraction happening in the portafilter during a brew-cycle, the craft of pulling espresso, and pitfalls to avoid (and the flavors those cause).
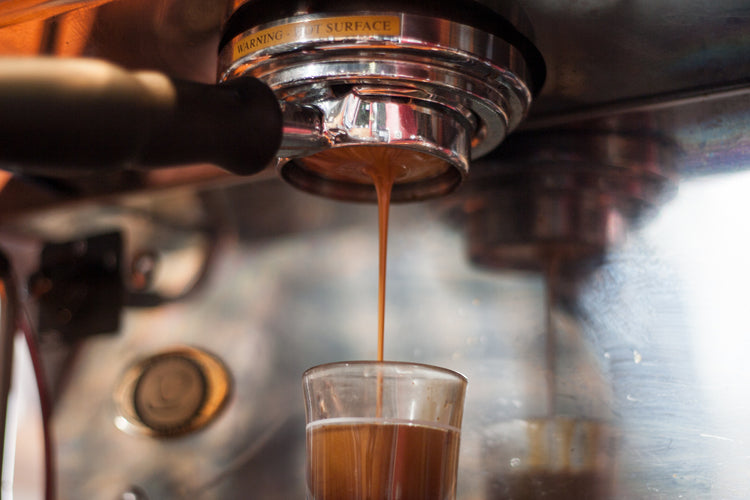
As with most brewing methods, there are a series of reactions that occur when the hot water comes in contact with the coffee grounds and begins to extract the solids, liquids, and gasses which create the drink we know as coffee. The difference with espresso is that this reaction occurs under pressure. Espresso extraction occurs when water which is around 200-202 F is pushed through a compact bed of coffee (the puck) at 9 bars of atmospheric pressure, which equates to 9 times the atmospheric pressure or roughly 140 psi, and a 58 mm basket is 4.1sq in of area making it a total of 574 lbs of force (also why you can never out-tamp a professional espresso machine)! Because of this high pressure, certain issues can occur during the brewing process that can ruin the flavor of the shot. One of the most common issues in espresso extraction is called channeling. This is where a crack, hole, place of differing density, or weak spot causes water to run more quickly through those grounds than it does the rest of the puck. As I often tell people during training, water will always find the spot of least resistance and will exploit it. What this leads to is over-extraction along the grounds near the channel, and under-extraction for the rest of the puck. Another common problem deals with how to dial in the shot. Often, espressos will be ground too coarsely and the water will flow through too quickly leaving the grounds under-extracted. This under-extraction causes a weak shot, with a sour/salty flavor in the espresso. On the other hand, sometimes the espresso is ground too finely and the water will not be able to pass through quickly enough, and the shot will pull slowly causing over-extraction. This will result in a very intense flavor which many will identify as being bitter, woody, and acrid.
During the process of extraction, as with most brewing processes, a series of compounds will be removed from the ground coffee. The first of these compounds to be removed by the hot water will be carbon dioxide. This gas will begin to dissolve and be held in solution within the espresso. This is why it is important to let the coffee rest a few days so it can de-gas, ensuring that there will not be an over-abundance of CO2 in the solution (we let ours rest 5 days). In addition to CO2, a number of different organic compounds will begin to dissolve and be held in solution in the beverage. This list includes mineral salts, organic acids, volatile aromatic compounds, sugars, caffeine, sugar browning byproducts, alcohols, esters, and many many more. Additionally, the non-water-soluble compounds, like oils, held within the coffee grounds will begin to be emulsified in the hot water. Finally, actual bits of the coffee's cellulose and lignin fiber will be stripped off the grounds and held in solution (called fines). These help form the dark speckling on a good espresso.
In order to dial in our espresso by sight, it is important to look for a few benchmarks in the appearance of the crema, the volume of the liquid, and the amount of time it takes to pull that volume of liquid. Ideally, we are looking for espresso with good, thick crema. This means at the end of pulling a shot of Full Cycle or Ernesto's, you should be seeing at least a half inch of crema on top of the espresso. This crema should not be a pale brown, or a yellowish color, but like the above example should be a deep brown with speckling of darker brown or black in the crema itself. However, there should not be large yellow streaks in the crema (blonding which is a tell-tale sign of over-extraction and channeling). Ideally, you will be pulling between 1.5 and 1.75 ounces of espresso from your double portafilter. The sweet spot for the timing of the pull is between 30-45 seconds (excluding pre-infusion time). If you are finding yourself within these constrains you are doing well. If a shot you are pulling does not meet these criteria, then throw that shot out and pull a good one for the customer you are serving. It is better to waste a shot than it is to serve less than desirable espresso to our customers.
We always recommend that our baristas not only dial in the espresso visually, but also by paying careful attention to the taste of the espresso (because visually it can look perfect but in reality it tastes like crap). Even if you do not like espresso, at least take the time to learn what our espresso should taste like so you will be able to effectively do your job. We are looking for the flavor profile in our espresso: balanced citrus acidity, honey like sweetness, syrupy mouth-feel, complex spice tones, caramel, and a slight lingering chocolate and nutty flavor in aftertaste. If you notice that the flavor is too "punchy" and the spice too potent (it will also lack sweetness) then it is highly likely that the grind is too fine and the water is pulling through too slowly. Adjust the speed to faster (or coarser) in order to remedy the problem. If the espresso tastes too thin, and there is very little complex syrupy sweetness (and it is a little acrid) then it is likely pulling too quickly and the grind is too coarse (everything is under extracted). In order to remedy this, adjust the grind finer or slower.
Keep checking your grind settings for your espresso throughout the day as changes in temperature, air pressure, and the like will affect the way the water from the group head interfaces with the puck of espresso. Always check it in the beginning of your shift and pay close attention through the rest of the day.
In short:• Finish temperature between 140 - 150 F
• Micro-foam texture for all beverages
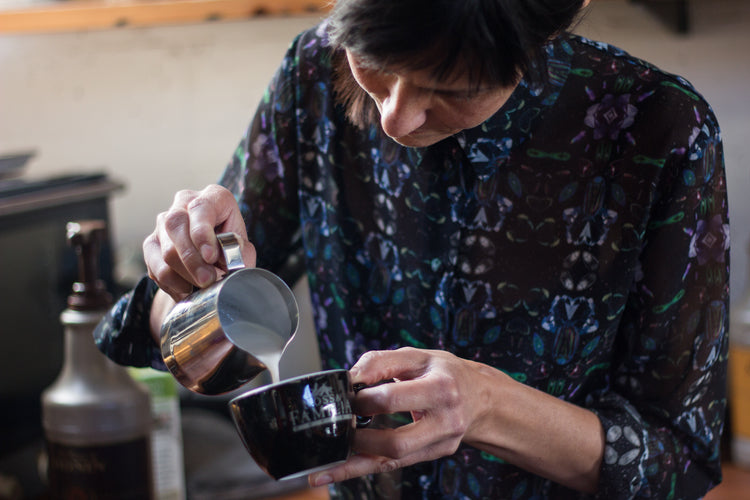
This brings us to the discussion of another important role of a Barista, namely the ability to steam properly textured milk (this actually includes not only the texture, but the temperature of the milk as well). We will begin with the discussion of the theory behind what we are trying to do with the milk, and then we will cover the practical steps we will be taking in order to achieve consistency and quality. The importance of our attention to detail with milk is demonstrated in 2 ways. First of all, in order for us to achieve latte art in our lattes and cappuccinos we must be producing quality milk. If the milk we are producing does not have the right temperature or texture, then producing latte art will be difficult or impossible. Secondly, when looking at the sheer volume of the drinks that we produce as baristas, we notice that the milk makes up more than 60% of the drink (often much more than that). Therefore, if the milk is bad, then the drink will be bad.
What we are trying to accomplish when we steam milk is the following: heat milk to 140-150 degrees, and texture the milk with micro-foam bubbles instead of the larger frothy bubbles we are accustomed to seeing. First of all, we will be discussing the importance of temperature, and secondly that of texture.
If the milk is not heated enough, the drink will not taste bad necessarily, the milk will simply taste like warm milk, but it will not have achieved the flavor potential that lies within. This is because lactose sugar (present in milk) is not water soluble at lower temperatures. Thus, our tongues have trouble detecting it. When we steam the milk, the chemistry of the lactose changes slightly and it becomes soluble which makes it easier for our tongues to taste and makes the milk seem sweeter. If the milk is steamed for too long, and becomes too hot (or is not given enough air during steaming) then the milk will begin to burn, and the entire drink will taste like burnt milk. However, when you learn to steam (by feel) within that temperature range, what you will taste is a natural sweetness in the milk. Paired with proper espresso, that is what will make a wonderful drink.
Secondly, a discussion about texture. In most cafes, when you order a latte or a cappuccino and let it sit for a few minutes, half of the drink will be gone. The reason for that is because of the size of the bubbles (foam) they are adding to the drink. The larger bubbles are not able to maintain their size because of the forces acting upon them (gravity, atmospheric pressure, etc.) and they begin to pop and release the trapped gasses. This causes the drink to lose its texture, and its volume. Additionally, if a drink is consumed and then the bubbles break down in the stomach and release their gas within the human digestive tract. You can fill in the rest. What we want to do is to create micro-foam, small bubbles whose structure is so compact that they can exist for a much longer duration of time and maintain the texture of the drink. These bubbles ought to look like a glossy coat on top of the drink, a sheen that reflects light, a truly silky milk foam.
On the next page, we will spend some time discussing how that sort of milk foam is created. Ultimately though, it comes through practice and experience, and not through the continual consideration of theory. Practice every day, and once you find yourself having consistent texture, you will be ready to create latte art.
First of all, it should be noted that some of these suggestions will change depending on the environmental conditions since a change in the weather, temperature, and barometric pressure, will alter the way you should steam your milked in order for it to come out correctly. But in regards to forming a starting base line for milk steaming, this guide will be helpful. Begin by bringing the milk pitchers out of the refrigerator (you want them to be cold because it will give you more time to texture the milk properly). Measure the milk out into a small pitcher (always use a small pitcher for 8oz, medium size pitcher for 12 and 16oz drinks, only using the large pitchers for large drinks) to the appropriate level (1/2 - 1/4 inch below the bottom of the spout for a small and medium in their respective pitchers, to the bottom lip of the spout for a 16 oz, and in a large pitcher leaving 1/2 - 1/4 inch for the 20 oz). Before beginning, purge the steam wand so any condensation will be removed by the force of the steam. Then, using the spout as a guide for the steam wand, submerge the tip of the wand an inch below the surface of the milk. Then, turn on the steam wand tilt the pitcher slightly, (<45 degrees) so the milk is forced to swirl which will cause the foam to be more completely incorporated into the drink. Next, bring the steam wand tip to the surface of the milk by lowering the pitcher and begin to stretch/surf/froth/pop the milk to create micro foam. These should be small, gentle hissing noises that do no resemble the sound of a jet turbine heard in many shops. After between one and three seconds (varies greatly with weather) re-submerge the tip of the steam wand about an inch below the surface and continue the swirling motion until you are finished. While steaming, you will be judging the temperature by hand. To do this you will need to develop a "count." This count will help you achieve consistent temperatures over and over again without the aid of a thermometer. During your first latte of the week, use a thermometer to check your count. Steam milk for a latte as normal, using a thermometer to gauge temperature. Keep your hand on the pitcher during this process. When the pitcher becomes too hot for you to hold onto, begin to count until the thermometer hits 135-140 (shut the steam wand - we are shutting it off below temperature because most thermometers have a 5-10 degree lag). Whatever number you have counted to is your "count." This will help you reach near perfect milk every time. While steaming milk, avoid removing your hand from the pitcher as it will cause your hand to cool slightly and give a bad temperature reading (also do not pat the pitcher as it will do the same thing). Make small, controlled movements instead of big motions so you effectively make micro foam bubbles.
In short:
I would like to begin by saying that latte art is just that, an art form. That being said I recognize that there a number of different ways to accomplish latte art, and different variations on the theme. What I am writing for you here is a way to troubleshoot your pours, and achieve latte art through written instruction. This type of instruction (though given verbally in training) has helped all of our baristas achieve latte art proficiency.
Latte art is a balancing act of sorts in which you are trying to provide balance between the buoyancy of the foam, and the weight of the milk, the speed of the pour, the accuracy of your motions, the darkness of the espresso crema and the white of the milk foam. In order to highlight this balancing act, I would like to explain in more detail how this works out during a pour.
As you can see, even in these few components of the latte art pour, it is a fine balancing act. What we will cover next is the basic pour for the blob heart.
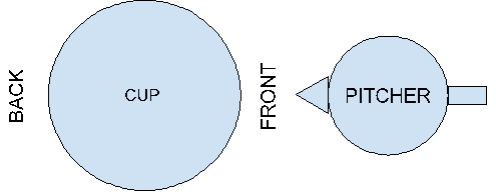
To begin, pour from 3 to 5 inches above the lip of the cup. You will want to pour slow enough to pierce the crema of the espresso and cause it to rise intact (not so slow that it causes bubbles to form in the crema) and fast enough that the milk will not separate in the pitcher. Also, in order to make sure that the foam and milk do not separate during your pour, make sure to swirl the milk vigorously before beginning your pour. You will continue to pour like so until the milk has reached 1/2 or 3/4 the way up the side of the cup. After it reaches that point, you will bring the pitcher as close as possible to the surface of the crema and pour the milk dramatically faster.
In order to pour the blob heart- and really any latte art - it is absolutely crucial that you start with properly pulled espresso and well textured milk. To begin the blob heart, situate the stream of the pour in the middle of the cup (possibly slightly toward the front of the cup). Bring the pitcher as close to the crema as you can while increasing your pour speed. The white of the milk foam will begin to form a dot on top of the espresso crema. Continue to pour out the doy until you near the top of the cup, then raise the pitcher up 3-5 inches and pull through the shape (pour a quick straight line with the stream starting from the front of the cup moving toward the back). This suction will tuck the top of the heart in and pull out the point for the bottom.

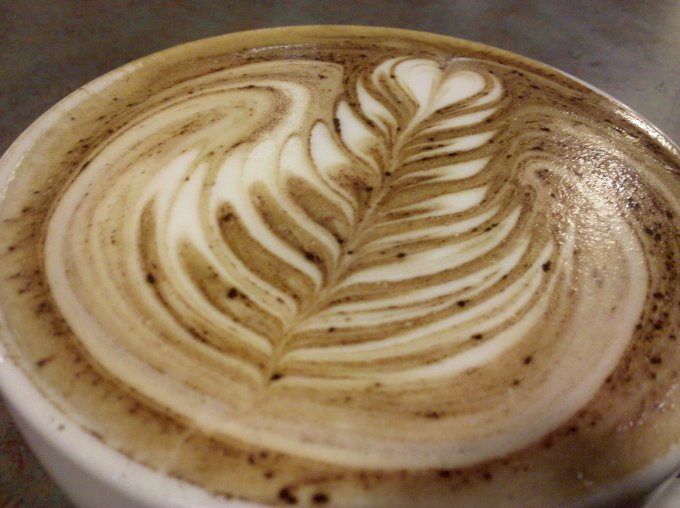
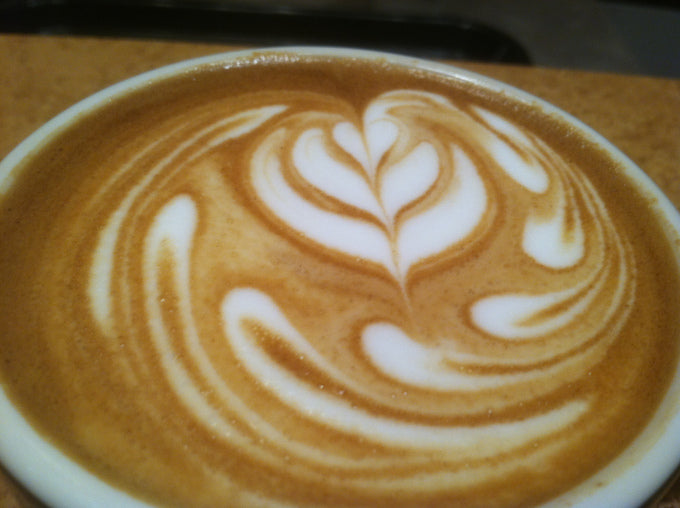
The layered heart is the next step in the latte art training. This shape is, in many ways, similar to the blob hear shape which you have been practicing. The primary difference is that you will be adding a gentle rocking motion (aka shake or wiggle) to your pour. Though this small difference may sound simple, it is one of the more difficult steps toward the Rosetta that you will likely take. You must make it a fluid and natural action, without raising your pour up off the crema and without losing the speed of your pour. Because of these difficulties many will find themselves having issues with this pour.
When done correctly, this pour will resemble the pour pictured above. The shake during the pour will create layers of milk foam broken up by espresso crema and when the pull-through occurs these will be zipped up into a tight, neat, layered heart.
The Rosetta is considered by many to be one of the more beautiful and complex latte art designs. As you will learn through practicing, you will be generating a lot of new muscle memory in order to become successful at pouring this design. First of all, if you are not already, make sure that you are holding the cup when you pour so you can control the tilt of the cup as well as the tilt of the pitcher. Though many people find this slightly unnerving, it is essential to pouring the Rosetta. What you will have to begin to do is try to get as close to the crema as possible as soon as possible. You will still pour into the center of the cup until you reach 2/3 or 3/4 full. At that point, push the stream of the milk to the back end of the cup. This motion should start the milk and crema moving down the middle of the cup and around the edge. Once you get the milk moving, begin the same sort of gentle rock that you practiced with the layered heart. Once this layered design begins to appear, begin to pull the stream forward (cross cup) to the front. Once shaking across the surface to the front, pull up and pour through your shape. This should use the suction of the pour to tuck the lines together and pull them slightly down toward the back of the cup. Another option (as pictured above) is to drop a layered heart or blob near at the top of the Rosetta shape and then pull through both the heart and the Rosetta in the same motion.
Learn more about our commitment to Sustainability at Nossa Familia.